AWS SNS
We support sending messages to the Amazon Simple Notification Service (SNS) - a highly available, durable, secure, fully managed pub/sub messaging service that enables you to decouple micro services, distributed systems, and event-driven serverless applications.
SNS Topic
Follow the Creating an Amazon SNS topic article on the AWS support site to set up a new SNS Topic. Once configured, copy the ARN of the new SNS Topic to set up a new Contact.
IAM Role
The AWS SNS integration authenticates by assuming an IAM role that you create in your AWS account. No IAM access keys are stored with Generator Labs, so there are no long-lived credentials to protect or rotate, and you can revoke access at any time by deleting the role or its trust policy.
You can create the role with AWS CloudFormation (recommended), or set it up yourself.
Create the Role with CloudFormation
The Add Contact form can create the role for you with an AWS CloudFormation stack:
- On the Add Contact form, select AWS SNS as the Contact Type and enter the Topic ARN.
- Leave Role Setup set to CloudFormation, and click Open in AWS CloudFormation. This opens the AWS console in a new tab, on a quick-create stack with the Topic ARN, your External ID, and the Generator Labs trusted principal already filled in. Sign in to the AWS account that owns the topic if you're asked to.
- If your topic is encrypted with a customer managed AWS KMS key, enter the key's ARN in the KmsKeyArn parameter (see the KMS note below).
- Tick the acknowledgement that AWS CloudFormation might create IAM resources, then click Create stack.
- Wait for the stack's status to change to
CREATE_COMPLETE. - Open the stack's Outputs tab, and copy the RoleArn value. Go back to the Add Contact form and paste it into the IAM Role ARN field.
Deleting the stack deletes the role, and stops Generator Labs from sending to your topic.
Set Up the Role Yourself
To create the role yourself, select Set up the role yourself under Role Setup on the Add Contact form. The form then shows the Trusted Principal and External ID values to use in the role's trust policy.
The role needs two policies:
- A trust policy that lets the Generator Labs integrations role assume it, but only with your account's External ID.
- A permission policy that grants sns:Publish on your SNS topic.
Trust Policy
In the AWS IAM console, create a new role, select Custom trust policy as the trusted entity type, and use this trust policy:
{
    "Version": "2012-10-17",
    "Statement": [
        {
            "Effect": "Allow",
            "Principal": {
                "AWS": "arn:aws:iam::696016272299:role/generator-labs-integrations"
            },
            "Action": "sts:AssumeRole",
            "Condition": {
                "StringEquals": {
                    "sts:ExternalId": "your-external-id"
                }
            }
        }
    ]
}
Replace the your-external-id value with the External ID shown on the Add Contact form. The Trusted Principal and External ID fields both have a copy button, so you can paste them directly into the trust policy.
Permission Policy
Attach this permission policy to the role to grant access to your SNS topic:
{
    "Version": "2012-10-17",
    "Statement": [
        {
            "Sid": "Alerts",
            "Effect": "Allow",
            "Action": "sns:Publish",
            "Resource": [
                "your-sns-topic-arn"
            ]
        }
    ]
}
Replace the your-sns-topic-arn value with the ARN of your SNS topic. Once the role is created, copy its ARN to set up a new Contact.
KMS-Encrypted Topics
If your SNS topic is encrypted with a customer managed AWS KMS key, the role also needs the kms:GenerateDataKey* and kms:Decrypt permissions on that key, and the key policy must allow the role to use it.
With CloudFormation, enter the ARN of the topic's KMS key in the stack's optional KmsKeyArn parameter, and the stack adds these permissions to the role. If you set up the role yourself, add this statement to the role's permission policy, replacing your-kms-key-arn with the ARN of the topic's KMS key:
{
    "Effect": "Allow",
    "Action": [
        "kms:GenerateDataKey*",
        "kms:Decrypt"
    ],
    "Resource": "your-kms-key-arn"
}
Topics encrypted with the AWS managed key for SNS (alias/aws/sns) can't be used, because the policy of an AWS managed key can't be changed to allow the role.
Payload
The format of the body of the message delivered to your SNS Topic can be configured as Plain Text or JSON (default).
Plain Text
The Plain Text version of the message is a simple text description of the check result, with a link to a public report that includes all the details related to the check. For example:
1 hosts listed, 0 hosts delisted. See link for more details. - https://rbltrack.com/fFMa1S
This is suitable for forwarding to messaging services, email, or SMS.
JSON
The JSON version of the message includes additional details, and is more suited for applications like a Lambda function, or passing to an HTTP service.
{
    "event_sid": "TAdde245352fc842d68c63f6693981be30",
    "event_type": "contact.trigger",
    "title": "RBL Listing Event",
    "message": "1 hosts listed, 0 hosts delisted. See link for more details.",
    "url": "https:\/\/rbltrack.com\/fFMa1S"
}
When a new contact is added, a success message is sent to your SNS topic, with an event_type of contact.success:
{
    "event_sid": "",
    "event_type": "contact.success",
    "title": "Successful Registration",
    "message": "This contact has been successfully configured with your Generator Labs account.",
    "url": "https:\/\/generatorlabs.com"
}
Adding a Contact
You can add an AWS SNS contact from the Contacts ➡️ Manage ➡️ Contacts section of the Portal.
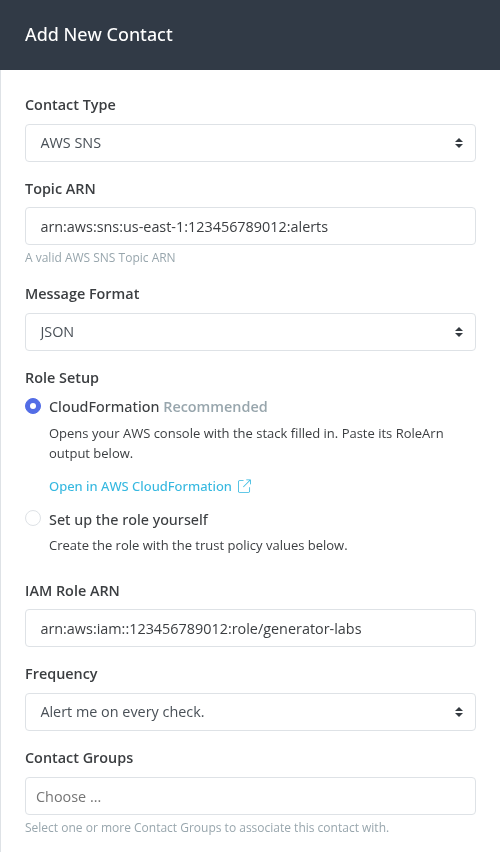
Select AWS SNS from the Contact Type drop-down, enter the Topic ARN of the SNS topic, and select a Message Format. Under Role Setup, create the role with CloudFormation, or select Set up the role yourself to create it yourself with the Trusted Principal and External ID values. Enter the IAM Role ARN of the role, then select a Frequency, and one or more Contact Groups to associate with this new contact.
After clicking Add Contact, the contact is active right away: there is no confirmation link to click. A success message is sent to your SNS topic so you can verify that the role and permissions are set up correctly.
The Frequency setting only applies to RBL Monitoring and will be removed in a future update. Other products such as Certificate Monitoring have their own alerting options.